Raised Garden Bed Plans: A 4 × 8 ft Cedar Bed
By Woodworking Nest Editors · Reviewed by Daniel Brooks · Updated
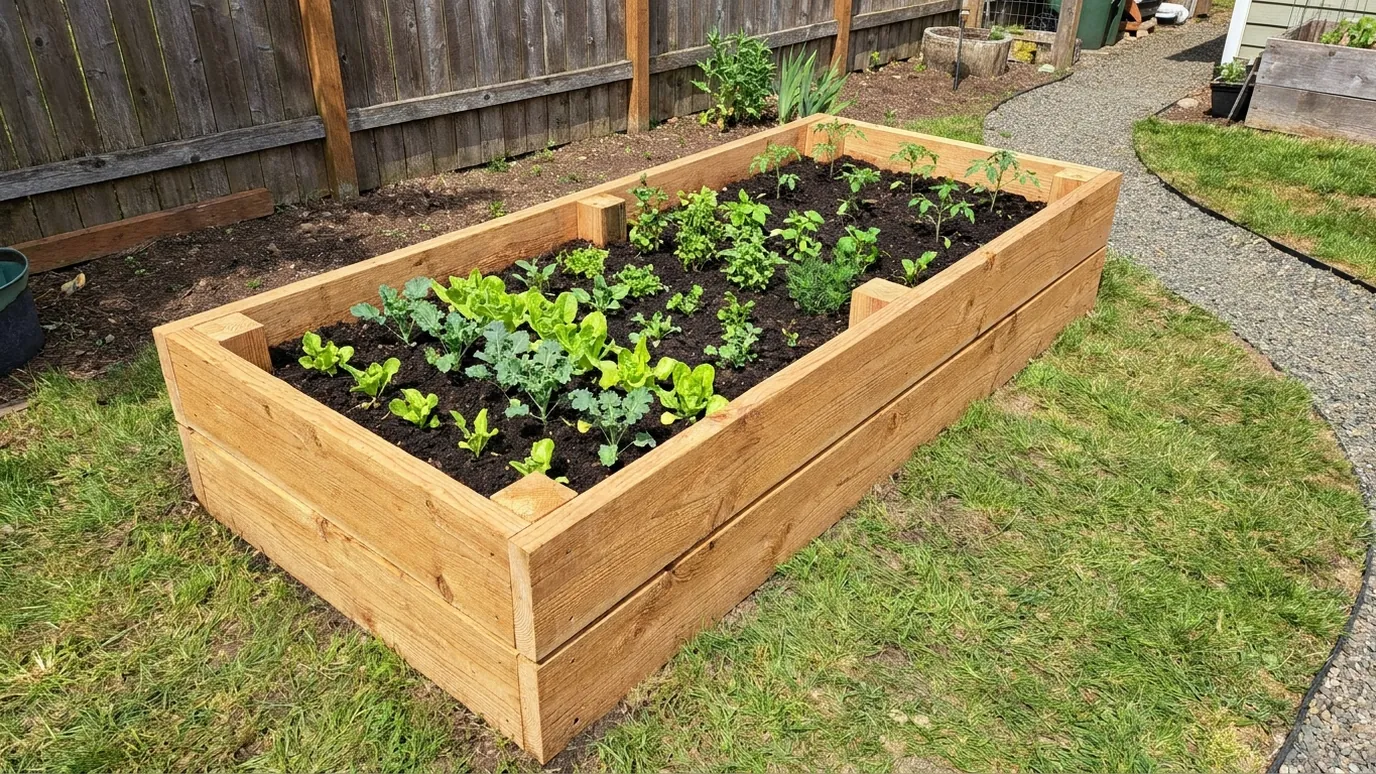
These raised garden bed plans build a bed 8 ft long, 4 ft wide and 11 in deep from six cedar 2x6 boards. The four long boards stay uncut, the end boards are 45 in, and 4x4 corner posts plus two middle supports hold it together. It takes about an afternoon with a saw and a drill.
If you are wondering how to build a raised garden bed that lasts more than a couple of seasons, the answer is mostly about the wood and the corners. This bed uses cedar 2x6s, which resist rot without chemical treatment, and joins them with screws into thick 4x4 corner posts, which grip much better than screws driven into the end grain of a board.
The size is the classic 4 × 8 ft. At 4 ft wide you can reach the middle from either side without stepping on the soil, and 8 ft is a standard board length, so the long sides need no cutting at all. Two courses of 2x6 give 11 in of soil depth, enough for most vegetables, herbs and flowers. A 2x4 support in the middle of each long side stops the boards bowing out once the bed is full of wet soil. If you want something smaller for a patio, our DIY planter box uses the same ideas at a smaller scale.
- Difficulty
- Beginner
- Build time
- About 2–3 hours, plus filling (estimate)
- Finished size
- 96 × 48 × 11 in
2438 × 1219 × 279 mm - Lumber
- Cedar 2x6 boards, 4x4 and 2x4 (or other rot-resistant lumber)
- Cost
- Six 8 ft cedar 2x6s, one 4x4 and one short 2x4 — check local prices
- PDF plans
- Coming soon
Dimensions
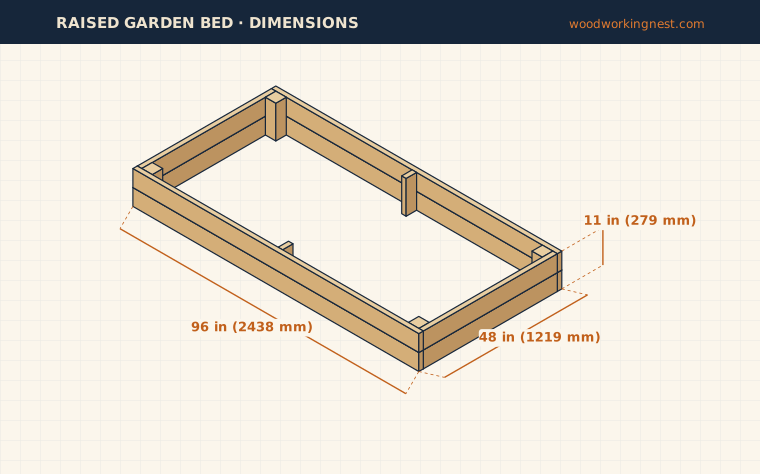
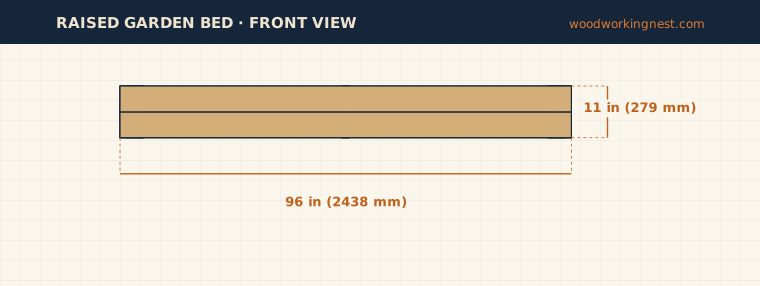
The finished bed is 96 in (2438 mm) long, 48 in (1219 mm) wide and 11 in (279 mm) tall. Inside, the growing space is 93 × 45 in, a little over 29 square feet. Eleven inches of soil suits most vegetables, salad crops and herbs; carrots, parsnips and potatoes appreciate more, so see the variations for a taller version. Note that rough-sawn cedar can be slightly thicker or wider than the 1 1/2 × 5 1/2 in used here. If yours is, cut the end boards to fit between the long sides rather than to the exact number.
Materials (shopping list)
Cedar is the usual choice for a vegetable bed because it lasts years outdoors without treatment. Redwood and larch work the same way. Modern pressure-treated lumber is a cheaper option and is widely used in gardens, but many gardeners prefer untreated wood or a liner where food grows; avoid old railroad ties and anything treated with creosote. Use exterior-rated coated or stainless steel screws. In the UK, look for 47 × 150 mm treated or larch boards; in Australia, 140 × 45 mm treated pine (H4 for in-ground posts) or cypress.
| Material | Qty | Size | Notes |
|---|---|---|---|
| Cedar 2x6 | 6 | 8 ft (2.4 m) | Straight boards, no large knots near the ends |
| Cedar 4x4 | 1 | 8 ft (2.4 m) | Corner posts; a shorter piece is fine |
| Cedar 2x4 | 1 | 2 ft offcut or longer | Middle supports |
| Exterior wood screws | about 60 | 3 in, coated or stainless steel | |
| Cardboard and hardware cloth | as needed | Optional: weed barrier and pest screen | |
| Soil and compost | about 1 cubic yard (0.76 m³) | Estimate for 11 in deep; varies with settling |
Cut list
This is one of the simplest cut lists on the site. The four 96 in side boards are full 8 ft boards, so check they are actually 96 in and square the ends if needed. Cut the four 45 in end boards from two more 2x6s, two per board. From one 8 ft 4x4, cut four 11 in corner posts, and cut the two 11 in middle supports from a scrap of 2x4. Cut the posts with a miter saw in two passes, or mark all four faces and cut carefully with a circular saw, because a 4x4 is thicker than one pass of most circular saws.
| Part | Qty | Length | Width | Thickness | Material |
|---|---|---|---|---|---|
| Side board | 4 | 96 (2438 mm) | 5 1/2 (140 mm) | 1 1/2 (38 mm) | 2x6 cedar |
| End board | 4 | 45 (1143 mm) | 5 1/2 (140 mm) | 1 1/2 (38 mm) | 2x6 cedar |
| Corner post | 4 | 11 (279 mm) | 3 1/2 (89 mm) | 3 1/2 (89 mm) | 4x4 cedar |
| Middle support | 2 | 11 (279 mm) | 3 1/2 (89 mm) | 1 1/2 (38 mm) | 2x4 cedar |
Tools
You need a saw, a drill/driver, a tape measure, a square and a level. A miter saw makes the 4x4 cuts quick; a circular saw works if you cut from two sides. Pre-drill every screw near a board end, because cedar splits easily. A shovel and a rake are handy for levelling the ground and filling the bed.
Essential: Tape measure, Miter saw, Drill/driver, Safety glasses, Speed square, Level
Optional: Shovel and rake
Step-by-step instructions
Step 1: Build the two end panels
Lay two 45 in end boards on edge on a flat surface, one on top of the other, to make an 11 in tall panel. Stand a corner post at each end, on the inside face, flush with the board ends and with the top and bottom edges. Pre-drill and drive three 3 in exterior screws through each board into each post, staggering them so they do not split the wood.
Build the second end panel the same way. Check that each panel is square by measuring corner to corner. The posts are what hold the whole bed together, so take your time getting them flush; a post that sticks up or down will make the bed rock.
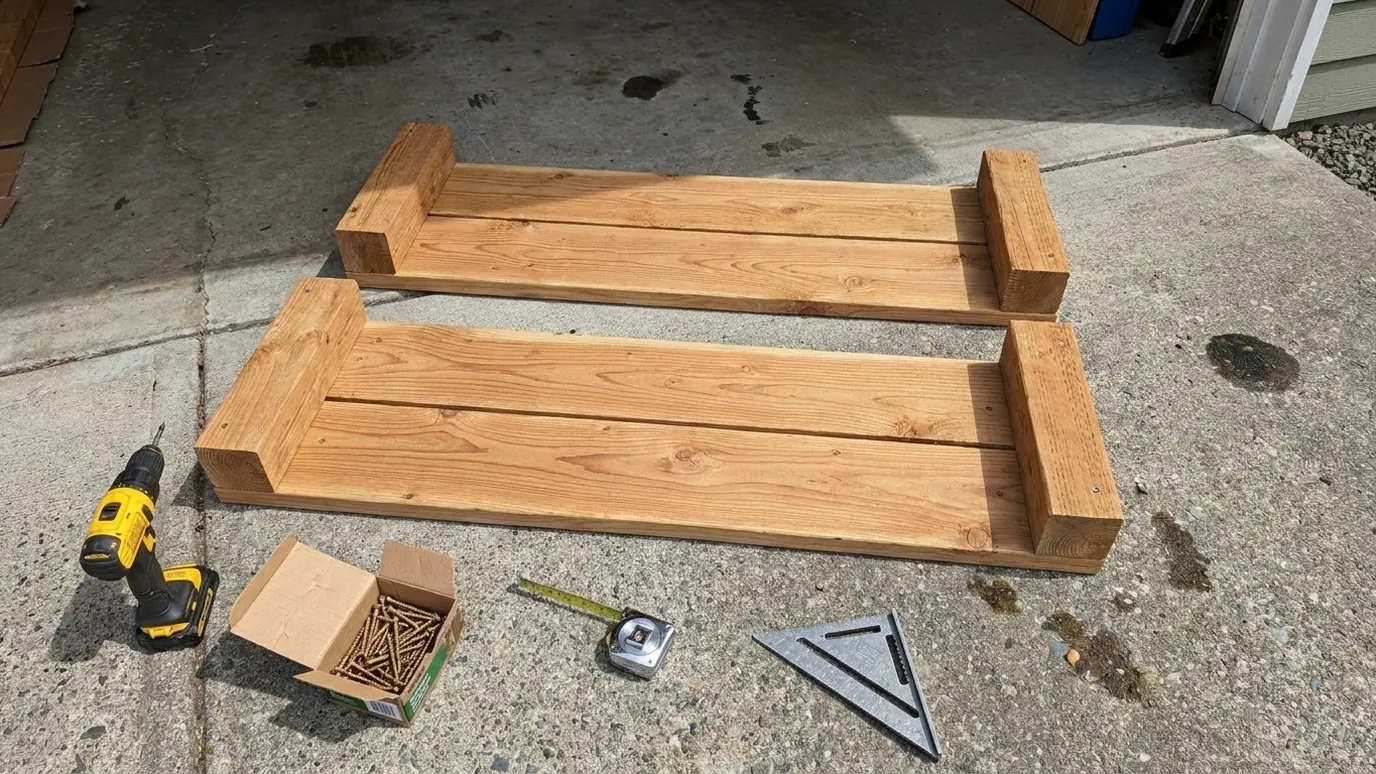
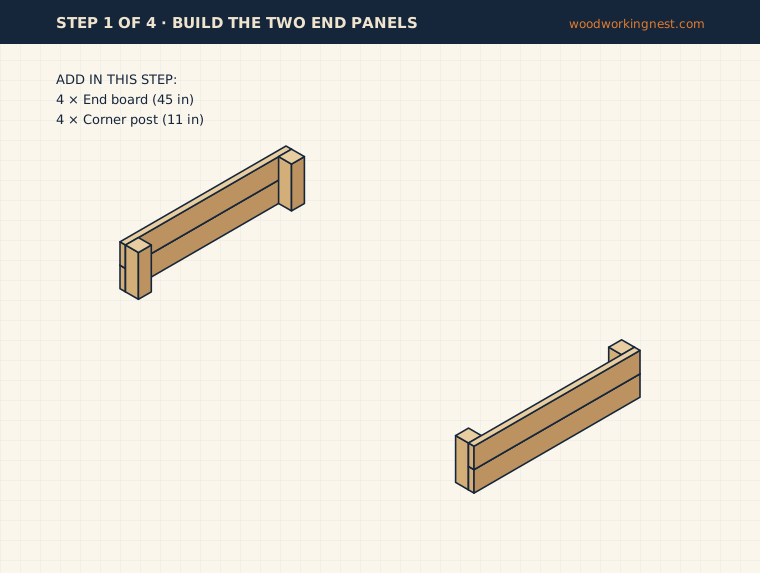
Tip: Use the flat floor of a garage or patio as your work surface so the panels come out flat.
Step 2: Attach the long sides
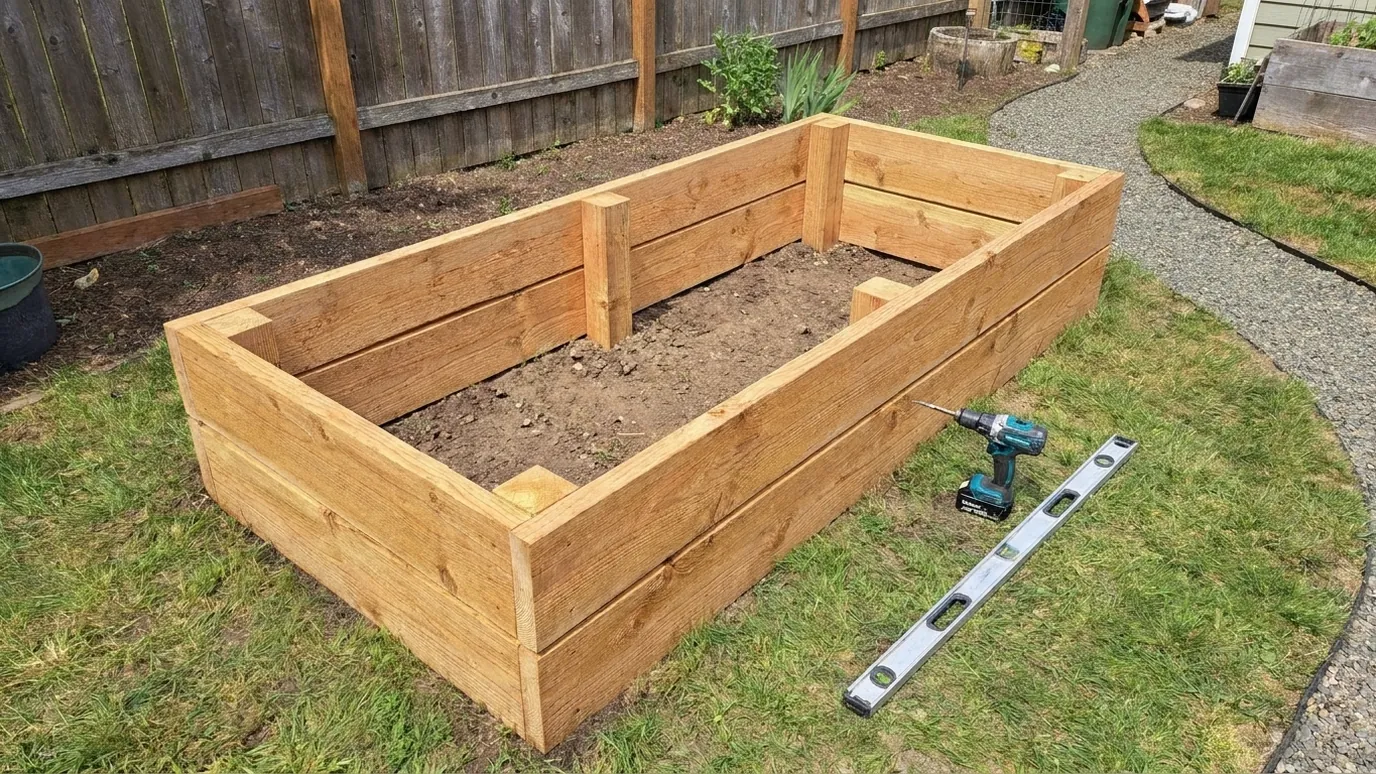
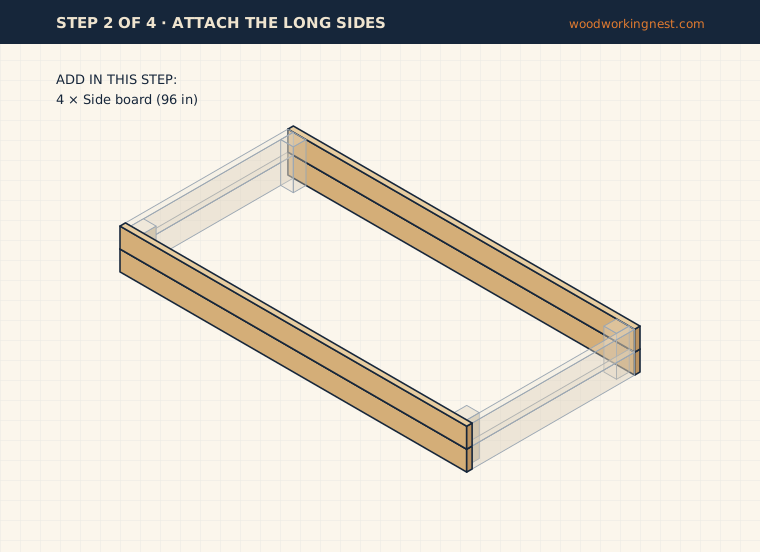
Stand the two end panels up about 8 ft apart, posts facing in. Lift a 96 in side board into place against the end of each panel so it covers the end grain of the end boards, with its ends flush with the outside faces of the panels. Pre-drill and drive three screws through the side board into each corner post. Add the second side board above it, then do the same on the other long side.
Measure the bed corner to corner across the top. When both diagonals match, the bed is square. Push on the long corners to adjust before the last screws go in.
Step 3: Add the middle supports
Mark the center of each long side, 48 in from either end. Hold a 2x4 middle support on the inside face at the mark, flush with the top and bottom of the boards, and screw through both side boards into it from the outside. Do the same on the other long side.
These two small pieces matter more than they look. Wet soil pushes outward hard, and an 8 ft side without support will bow in the middle within a season or two. For an even stiffer bed, connect the two supports with a 45 in 2x4 across the top as a tie. It also makes a handy place to rest a tool while you work.
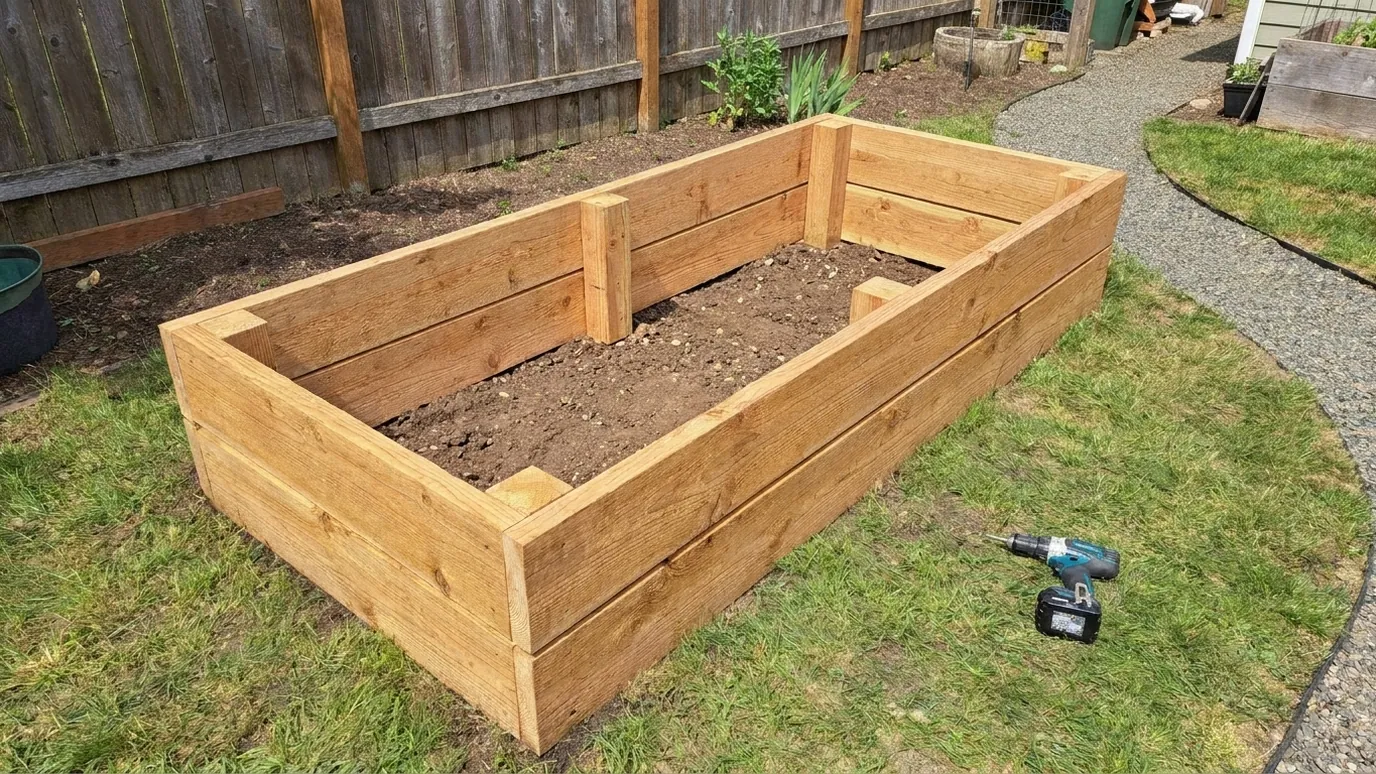
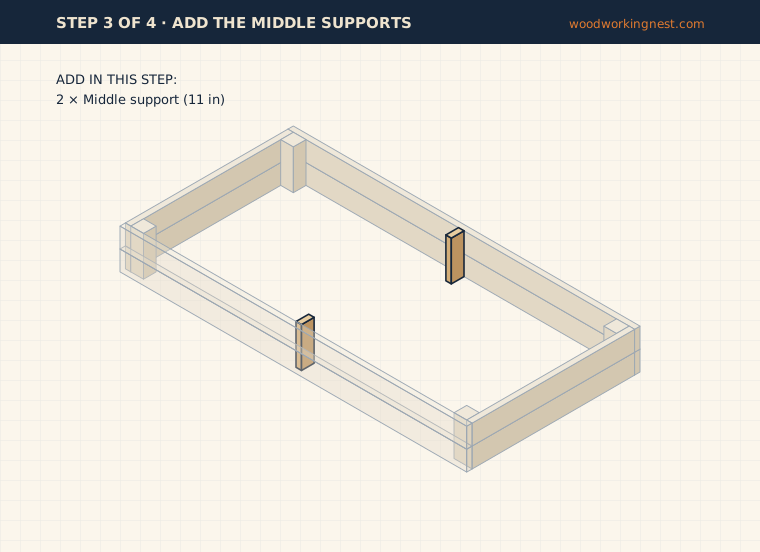
Tip: Pre-drill these screws too; the support sits right in the middle of the board where splitting is most visible.
Step 4: Level, line and fill the bed
Choose a sunny spot that gets at least six hours of direct sun. Set the bed in place and check it with a level across both directions. Dig down under the high corners rather than propping up the low ones, so the boards sit on firm soil all the way around. If you have burrowing pests, staple galvanized hardware cloth across the bottom before filling.
Lay cardboard over grass or weeds inside the bed; it smothers them and breaks down over time. Fill with a mix of good topsoil and compost, roughly two parts soil to one part compost, to about 1 in below the top. Water it well and let it settle for a few days before planting.
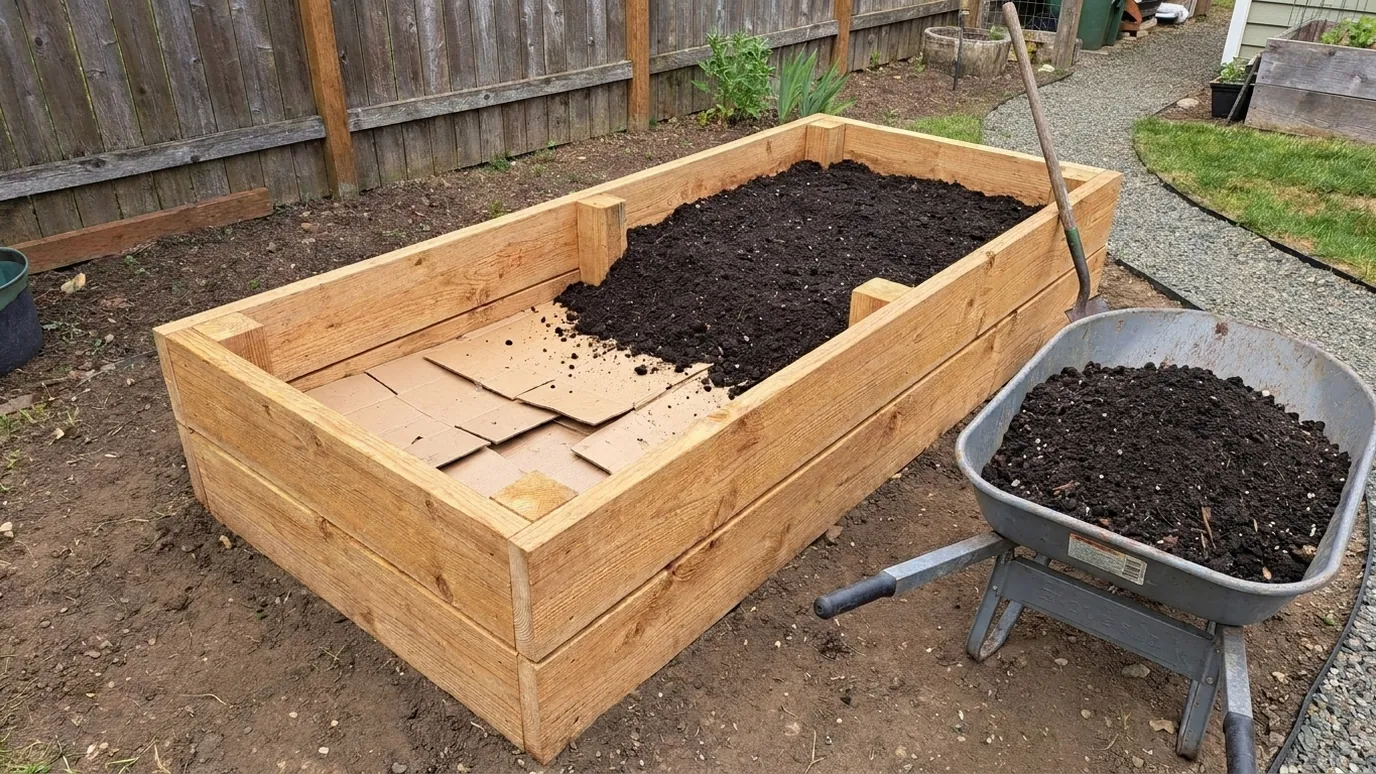
Tip: Fill in layers and water each one, so the soil settles evenly instead of sinking later.
Finishing
Cedar does not need a finish. Left bare, it weathers to a soft silver grey within a year, which many gardeners prefer. If you want to keep the warm color, apply a penetrating oil made for exterior wood to the outside faces only, and let it dry fully before filling. Avoid finishes on the inside where soil and roots touch the wood. Some gardeners line the inside walls with heavy plastic sheeting to keep wet soil off the wood; leave the bottom open so water can drain.
Common mistakes to avoid
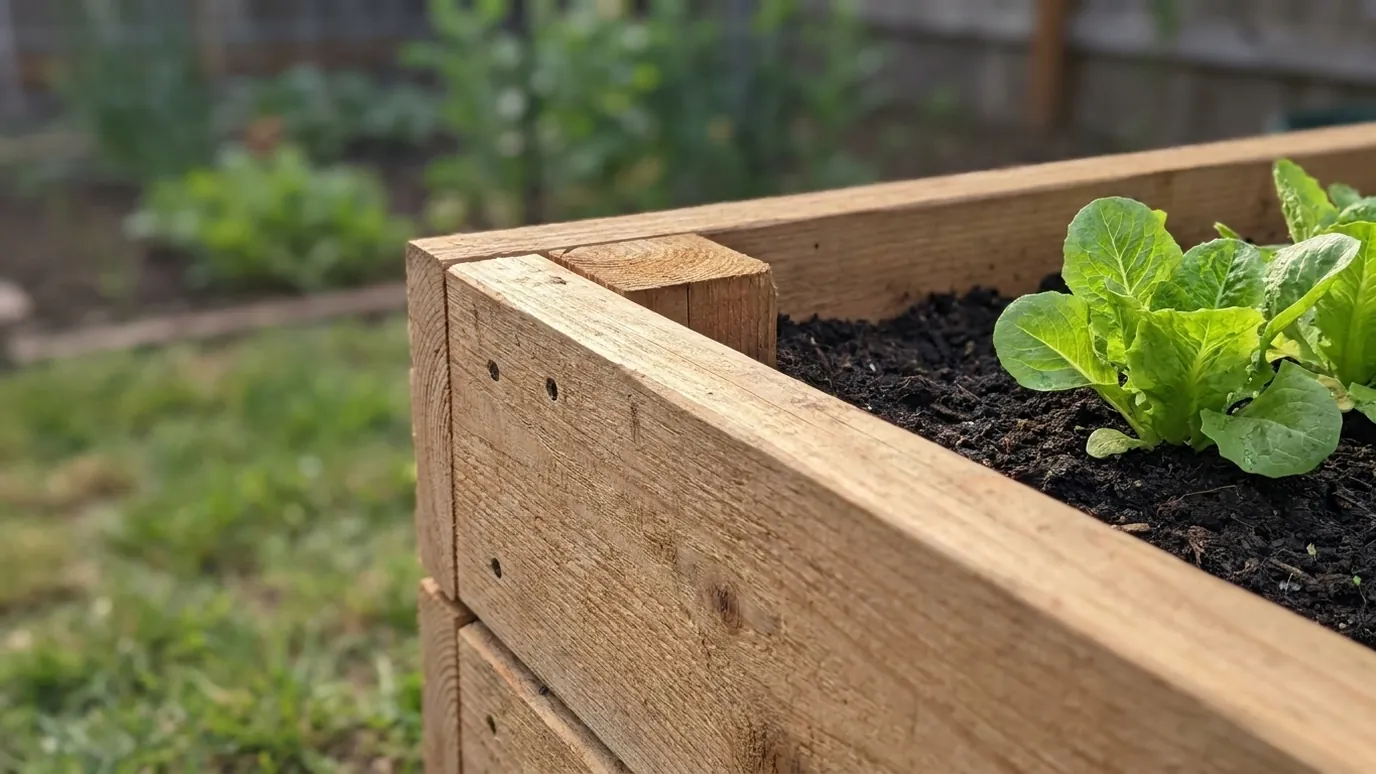
The most common mistake is driving screws into the end grain of the boards instead of into corner posts. They pull out as the wood swells and shrinks. The second is skipping the middle supports on an 8 ft bed, which lets the long sides bow outward. The third is setting the bed on uneven ground: the boards twist, gaps open at the corners and soil washes out. Level the ground first, even if it takes longer than building the bed.
How to change the size
For a deeper bed for root crops or easier reach, add a third course of 2x6 and make the corner posts and supports 16 1/2 in long. To save space, a 4 × 4 ft version uses four 45 in end boards and four 48 in side boards. Add a 2x6 cap laid flat around the top as a seat ledge, mitered at the corners. If you build several beds, leave at least 2 ft between them for a path wide enough for a wheelbarrow. For seating near your beds, see our 2x4 bench.
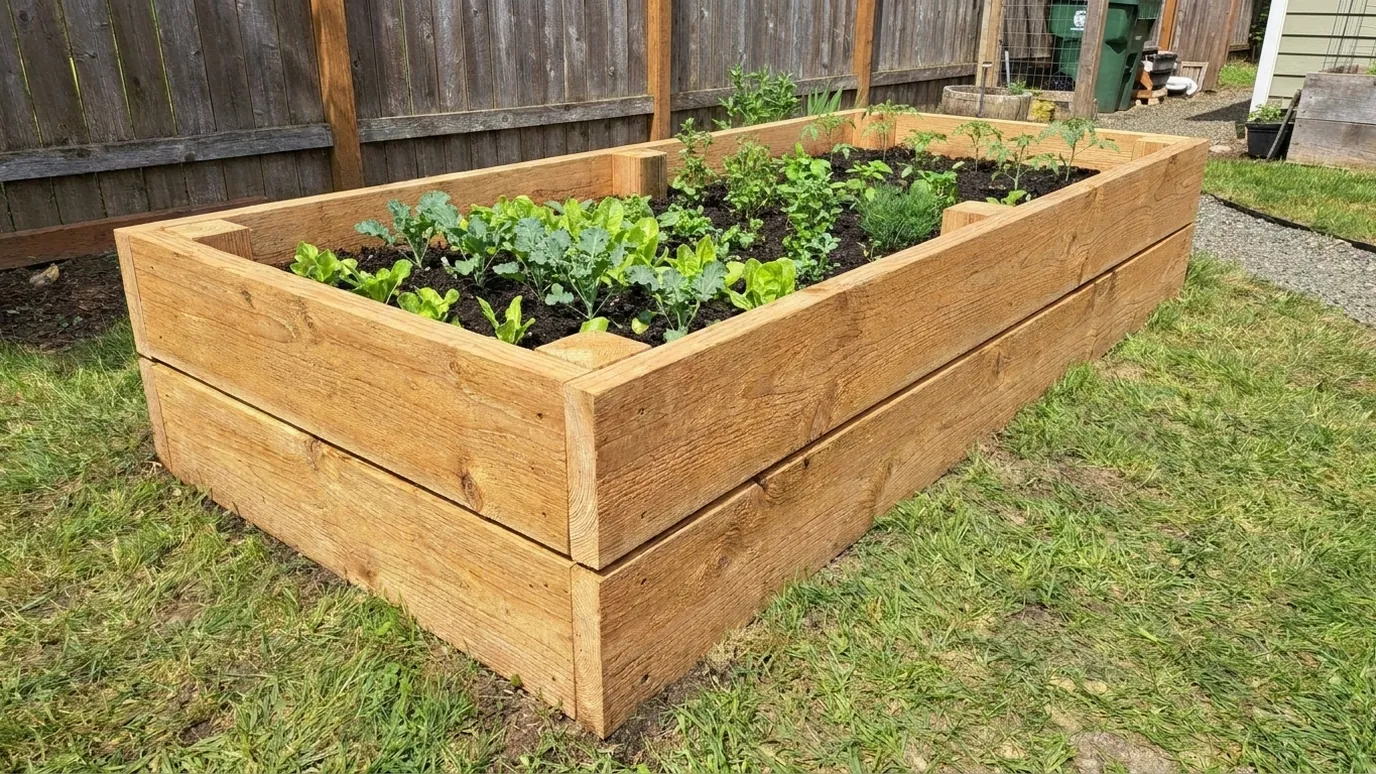
Finished raised garden bed photos
Safety
Wear safety glasses when cutting and gloves when handling rough cedar, which splinters easily. If you use pressure-treated lumber, wear a dust mask when cutting it, wash your hands afterwards and never burn the offcuts. Lift long boards with a helper. Call your local utility locator service before digging if you plan to set posts into the ground. Read our woodworking safety guide before you start.
Frequently asked questions
Are these raised garden bed plans good for beginners?
Yes. Only two cut lengths need cutting, the long sides use whole 8 ft boards, and everything is screwed together. You need a saw, a drill and a level.
How deep should a raised garden bed be?
About 10–12 in (25–30 cm) suits most vegetables and herbs, which is why this bed is 11 in deep. Root crops such as carrots and potatoes do better with 16–18 in.
What is the best wood for a DIY raised garden bed?
Cedar is the most popular choice because it resists rot without treatment. Redwood and larch are good alternatives. Pressure-treated lumber lasts longer for less money; many gardeners line it or prefer untreated wood for food crops.
How much soil do I need for a 4 × 8 raised bed?
A 4 × 8 ft bed filled 11 in deep holds roughly 29 cubic feet, about 1 cubic yard (0.76 m³). Buy a little extra, because soil settles after watering.
Should I put anything in the bottom of a raised garden bed?
Cardboard over grass or weeds smothers them and breaks down over time. Galvanized hardware cloth keeps out burrowing animals. Avoid plastic on the bottom, which stops drainage.
How long does a cedar raised bed last?
It depends on your climate, the grade of cedar and how wet the soil stays. Cedar beds commonly last many years; keeping the bottom edge on well-drained ground helps.
Related plans
2x4 Bench Plans: Simple DIY Bench for Indoors or Out
2x4 Workbench Plans: A Sturdy DIY Workbench With a Shelf
More plans: all outdoor woodworking plans · every free woodworking plan · board foot calculator
How this plan was made
This plan was designed from a full 3D part model and checked so the cut list, the diagrams and the finished size agree. It has not yet been built and photographed by us. The joinery and sizes follow common, well-tested raised bed practice.
 Technically reviewed by Daniel Brooks on . Senior woodworking contributor and technical plan reviewer. He checked the measurements, the materials and the assembly steps.
Written by Woodworking Nest Editors. Measurements, the cut list and all diagrams come from one shared 3D part model, so they always agree. Photos marked “Illustrative render” were created with AI image tools to show the finished look; they are not photos of a real build. Status: Technically reviewed. Found a mistake? Tell us and we will fix it (see our corrections policy).